Recent Posts

Showing posts with label cooking. Show all posts

Sunday, March 20, 2011

The Candied Orange Peel Experiment.


The combination of orange and chocolate is one of my favorites.  Every Christmas, my mom used to put one of those foil-wrapped chocolate oranges in the bottom of our stockings, and I remember that I always tried to make it last, but inevitably ended up consuming it before New Year's Eve.  Maybe it was my favorite because I got to whack the crap out of it before consuming, but I'm almost positive that the reason I went for it first was because of that amazing combination of flavors.  James has come to realize that a package of Orange Milano cookies placates the infamous "funks" that occasionally consume me, so whenever he starts to see the initial warning signs (moodiness, apathy, general unpleasantness), he knows to pick up a package at the store. 

I'm the type of person that obsessively researches something once I get it into my head that I'm going to try it.   So, when, during a recent visit to a local restaurant, a few friends and I ordered a dessert which consisted of shaved chocolate, whipped cream, and candied orange peel, I was immediately infatuated, and had a nagging urge to make candied orange peel.   I found various different recipes (and consulted with James's fancy Professional Pastry Chef book, which intimidates the bejesus out of me because it's all professional and measures things by weight instead of volume), and finally came up with a "recipe" that I felt comfortable trying.


Candied Orange Peel dipped in Dark Chocolate

(I referred frequently to David Lebovitz's recipe for candied ginger, but basically came up with this one on my own, through trial and error)

Ingredients:

4 oranges, unsprayed or thoroughly washed
2 c water
1 c granulated sugar, plus more for coating
Dark chocolate chips (or bars, coarsely chopped)

1. Using a vegetable peeler (I prefer using the Swiss kind because it scrapes a minimal amount of skin from my knuckles), remove the peel of the oranges in strips (unsprayed/organic oranges are preferred because of the pesticides used on conventionally grown fruit, but if you can't find any, or just don't want to pay the exorbitant prices for organic fruit, then just wash them thoroughly with vinegar and water).

2. Using a butter knife, remove any of the white pith that remains on the peels.  The pith is very bitter and will make your candy taste the same if it isn't removed.  (Pictured below, the peel on the left has been scraped and the peel on the right still has some pith attached.)


3. Add the scraped peels to a pot of cold water and bring to a boil.  Boil the peels for 5 minutes, drain, rinse in cold water, then repeat two more times with fresh, cold water.  Using a non-reactive pan is best when dealing with citrus, because the acid in the citrus fruits (especially lemons) reacts with aluminum to produce a metallic taste in whatever you're making.  I found this out the hard way when making lemon curd for the first time.

4. Bring 2 c water and 1 c sugar to a boil.  Add the blanched orange peels to the boiling sugar solution and simmer on low approximately 30-45 minutes, until the peels are translucent.  You're going to want to keep an eye on these, because the sugar-water will reduce to a syrup and will eventually cook until burned (I've also had the unfortunate experience of dealing with this when I neglected a poached pear syrup). 


5. Remove the peels from the syrup when the bubbles start to become bigger.  Turn off the heat and remove each peel, one-by-one, with a pair of tongs and coat in granulated sugar.  The peels will be covered in molten sugar syrup, so don't try to eat them or get any on your fingers, as molten sugar is like napalm (rinse immediately with cold water if you do get it on you). Shake off excess sugar, and try to avoid lumps of sugar sticking to the peels by brushing them off as they form.  Transfer the sugar-coated peels to a baking sheet covered with parchment or wax paper to dry for approximately 1 hour (or overnight if you're not coating in chocolate).  The syrup can be reserved for use in other recipes, and I'm sure it would make a lovely iced tea sweetener.  If you decide to dispose of it, as I did, do NOT dump it down your kitchen sink, unless, of course, you'd like to spend some quality time with your plumber in the near future. 


6. Bring a pot of water to a boil.  Add the chocolate chips to a heat-proof bowl and place over the boiling water to melt the chips.  Stir occasionally to help the chocolate melt faster. 

note that if you're planning to use a stainless steel bowl like I did, use an oven mitt, because the bowl will become HOT ­­­– no joke

7. When the chocolate is melted, turn off the heat and begin to dip the sugar-coated orange peels in the chocolate.  Return each dipped piece to the parchment/wax paper and when all the pieces are dipped, transfer to the refrigerator to set for about 20 minutes. 


Candied orange peels will last up to a week when dipped in chocolate and should be stored in an airtight container at room temperature.  Without the chocolate, they will last a few months in an airtight container.

These are sure to please and impress.  The resulting peels are very sweet and have a texture reminiscent of chewy gummy-candy, with a rich complement of dark chocolate.  While not exactly a cinch to whip up in the kitchen, they're definitely a recipe that can be successfully completed by most, with a little love and patience, and would make a great gift.  

Monday, September 13, 2010

A Farewell to Peaches.

 image from here.
 A couple of months ago, while reading an issue of House Beautiful Magazine, I came across a cookbook review for Miss Dahl's Voluptuous Delights: Recipes for Every Season, Mood and Appetite, by Sophie Dahl.  I was intrigued by the interview, but what really convinced me to go purchase the book that day, was her recipe for Cinnamon Roast Peaches.  This recipe is easy.  And Delicious (with a capital D).  I've been making it throughout the summer, and am sad to say that I think that this past weekend will have been my last foray with this recipe for a while, as peaches are past peak.  (Although, I couldn't resist buying some more peaches on sale at Whole Foods this weekend, so I guess I'll make the recipe at least once more!)  
I don't follow the recipe exactly, but since it's pretty loosey-goosey to begin with, it's difficult to screw these up.  I once tried substituting nectarines, because, quite frankly, fuzzy peach skins sometimes enliven my gag reflex, but the substitution really wasn't as good as the peaches.  I think that this recipe could be great with apple wedges or pear halves in the fall/winter, when peaches are no longer in season, but don't take my word for it.   
Cinnamon Roast Peaches
adapted from Miss Dahl's Voluptuous Delights
2 peaches, ripe but firm
Cinnamon
Brown Sugar
Butter
Greek Yogurt (I prefer Vanilla)
Honey, optional
Preheat oven to 450 degrees.  Halve the peaches, removing the pits, but keeping the halves generally intact.  Place peaches in a roasting pan, and sprinkle each half with cinnamon and brown sugar, then top with a small dab of butter. Roast in the oven 10 minutes, or until the peaches are soft and the butter has melted.  Serve warm with a dollop (or two) of yogurt.  Alternatively, you could sweeten the yogurt with a drizzle of honey, but I prefer the contrast of the tangy yogurt with the sweet peaches.

Tuesday, February 16, 2010

Dinner for Four, Please.

This weekend, I held my first (of many to come) formal-ish dinner party.  I don't mean formal in the sense that everyone dressed up in ball gowns and we ate caviar, just the type where I actually had a three course dinner planned, used the "nice" plates, linen napkins, and water glasses, and did not wear sweatpants (I know, right?!) 

Since I was so nervous, I made a soup (easy), salad (easy), and dessert (terrifying).

The Menu:

Baby Arugula Salad with Roasted Golden Beets, Blue Cheese, 
Cracked Pepper, Pink Sea Salt, and Sesame Dressing

French Onion Soup with Mushrooms and Barley, 
accompanied by delicious French bread that I did not make 
(thanks Kathryn!)

French Pear & Almond Tart, with Shortbread Crust

The soup and salad were easy.  I made the soup the night before (and made some substitutions to the original recipe -- used beef broth instead of water, more ginger, omitted the beef, and didn't forget the sesame oil), and roasted the beets that morning.  The pear tart was the part that scared me the most, because I had never made this sort of tart before. 

I had scoured the internet for a dessert recipe that would go with such an already earthy menu.  I knew that I couldn't use citrus, and I didn't want to do a chocolate dessert, because I felt that it would be far too rich.  I finally got the idea to make a tart of some sort (since I had perfected the shortbread crust not too long ago), and decided on pears, because they're readily available in the winter and are pretty hearty.  The French and almond parts came into play when I was doing more research.  I happened upon David Lebovitz's blog, and fell in love with his French Pear Tart recipe (along with many of his other recipes).  I used the shortbread crust recipe from Ina Garten's cookbook, The Barefoot Contessa Cookbook (except I doubled the quantities to make for a more substantial crust).  Everyone seemed to like it, and James gave it the seal of approval (my toughest critic, besides myself). 

First, I poached the pears in sugar and water, and added a whole vanilla bean.  I followed David Lebovitz's recipe pretty much to the T (I used organic Bosc pears which held up nicely and had great flavor), except I put a cover on the pot instead of using the parchment paper.  Then, I made the Almond Cream also according to his recipe, only I omitted the liquor at the end.  I don't know if it made a difference.  I had a significant supply of poached pears on-hand afterward, because I found that I didn't need the 5 I had poached.  I assembled and baked the tart according to the recipe, except I didn't add cherries or any other fruit; just pears.  The 40-minue bake-time left me with a slightly over-cooked crust, so in the future, I would probably pre-bake the crust for only 10 minutes instead of 15 (if at all). 

Here's the final result:


 I glazed it with the reduced poaching liquid, and served it with vanilla bean ice cream.  Dish Delish.

 I felt that the whole dinner was successful, because nobody recoiled in disgust after tasting any of it, and if they didn't like it, they hid it well.  My dinner guests were very polite!

 
Oh hey, what's this... a picture from a snazzy new camera?  YES!   :o)
(I'm still geting used to it, and it frightens me a bit since it's a DSLR with lots of settings)


Shortbread Tart Crust
adapted from The Barefoot Contessa Cookbook, by Ina Garten

3/4 c unsalted butter at room temperature
1/2 c sugar
1/2 tsp pure vanilla extract
1 3/4 c all-purpose flour
pinch salt

Preheat oven to 350 degrees.

In the bowl of an electric mixer fitted with the paddle attachment, mix butter and sugar together until they're combined.  Add vanilla extract, flour and salt (sifted together -- although I didn't sift and it turned out just fine).  Mix on low speed until the dough starts to come together.  Gather dough and press it into a 10-inch round false-bottom tart pan.  Be sure to make the finished edge flat.  Chill until firm (I put mine in the freezer until totally firm).  
Butter one side of a square of aluminum foil (make sure it will completely cover the bottom of the tart) and place it in the bottom of the tart, buttered side down.  Fill with beans and press the foil down around the sides, but don't cover the edges of the crust.  Bake 10-15 minutes, then remove beans and foil and bake 5 minutes more.  

If you're planning to fill the tart with a fruit-curd (like lemon!), then cook the crust 20 minutes with the beans and 20-25 without the beans, so it's completely cooked through.  Cool, then fill with your delicious curd.

Wednesday, January 13, 2010

Waffles? Why, yes.

Are any of you like me and simply had-to-have-a-waffle-iron-or-your-head-might-explode?  Probably not...  I received our waffle iron as a wedding present and have used it once.  Maybe twice.  James continuously teases me about the kitchen electric that is taking up valuable (very valuable in our tiny kitchen) cabinet space.  Finally, I have a, "see, I told you so" excuse for owning a waffle iron:


Awesomeness in its most concentrated form.


image from here, obv.

I love homemade waffles, even if I've only made them once... maybe twice.  I have to say that the s'moreffles look divine. 

Anyway, just thought I'd pass along this very important discovery.  That is all.


Wednesday, November 25, 2009

Pre-Thanksgiving Madness.


 this is a williams-sonoma pie, not mine (unfortunately)... 

Last year, I took it upon myself to volunteer to make desserts for Thanksgiving dinner at two houses.  I decided to make an assortment of pies and a few extra things because I was feeling ambitious.  I also decided that it would be best if I made everything from scratch, since it was my first time contributing to the holiday meal -- No store-bought pie crusts for me!  I spent weeks collecting recipes for different pies, crusts, and whipped cream variations.  The week before, I made sure I had all the ingredients I needed, and waited until the day before Thanksgiving to begin my brilliant bake-a-thon.  While I want to say that I put on my apron, made pie crust that cooperated beautifully, and everything was wonderful, I cannot. 
 
First of all, I do not bake in an apron  (I don't even own an apron -- I bake in sweatpants and a sweatshirt), the pie crust was not cooperating beautifully; everything was not wonderful.  By 7pm (I had taken the afternoon off of work and had been working diligently since 2pm), the pie crust had reduced me to a teary, floured mess, the smoke alarm had gone off twice, and my carbon monoxide detector went off (I opened up all the doors and windows so as not to asphyxiate myself, because this pie crust was not going to be the death of me, and it was freezing outside).  I was determined to get it right, so I kept working on it until it was correct.  Needless to say, I didn't get much sleep that night, although the pies were a hit-- Thanksgiving Miracle!   I learned a valuable lesson: Practice the art of pie crust in advance and do not wait until the night before Thanksgiving to begin these shenanigans unless you are experienced!! 

So, last night, I approached my kitchen, brought out my flour canister and supplies and went all John Wayne on them before I began: "Listen here Pilgrim..." 

I made three different batches of pie crust with no issues whatsoever. (I'm knocking fervently on wood, though!)  I think my successes were due to the fact that I found a "no-fail" recipe that I had tried out earlier last week in a quiche.  In case anyone fears pie crust like I do, you can rest assured: The nice people at King Arthur Flour have provided a recipe that is simple and delicious.  You can find the recipe here (with great step-by-step pictures), or you can read my variations below:

Ingredients:
  • 2 ½ cups regular All-Purpose Flour (I used grocery store brand)
  • 1 teaspoon salt
  • 1 teaspoon baking powder
  • 2 tablespoons confectioner's sugar (just omit this if you want to make a savory recipe, like quiche)
  • 2 tablespoons buttermilk powder (I found it in the grocery store with the weird canned milk products -- condensed, evaporated, etc. -- that I never like to use, because let's face it, canned milk is weird, but powdered milk is also weird, so I guess just swallow your fears and proceed)
  • ¼ cup vegetable shortening
  • 10 tablespoons very cold unsalted butter
  • 1 teaspoon vinegar, cider or white (I used white, and don't worry, you can't taste it... the vinegar is used to tenderize the crust by preventing long strands of gluten to form -- yay, chemistry!)
  • 7 to 10 tablespoons ice water
** For a Cinnamon-Spice crust, add 1/2 tsp Cinnamon, 1/4 tsp ground cloves, and 1/4 tsp ground nutmeg to your dry ingredients.  It's delicious! **


 Directions:
  1. Mix together all of your dry ingredients in a large bowl.
  2. Cut in the shortening with a pastry cutter, or your hands, until it has formed pes-sized beads.
  3. Add your butter in small amounts, cut up into tablespoon-sized blocks.  Use your pastry cutter (or hands) to incorporate it into the flour mixture as with the shortening.  You don't need to be overly-zealous with this process, and if you have big chunks of butter, it's ok.  I promise.
  4. Add your vinegar and four tablespoons of water to the mixture one tablespoon at a time.  I found that it doesn't matter whether you mix the vinegar with water or add it straight to the dry ingredients, although mixing it with water will give you a guaranteed better dispersion.
  5. Toss the mixture with a spatula or spoon to combine.  Add additional water to bring the dough together (I added approximately 8-9 T water).  
  6. Gather the dough into a ball, divide it in half, form your halves into disks, wrap them in plastic wrap, then refrigerate 30 minutes to an hour. You could also freeze the dough for up to two months, according to the King, but wrap foil over the plastic to seal it well.
  7. After you've chilled it, let the dough come to room temperature and roll it out to fit in your desired pie plate or tin.  Each disk should be enough for a one-crust pie recipe.
  8. Decorate the edges of your crust however you choose.  I prefer fluting, but I am also a bit hoity-toity, so if you'd like to fork it, then go right ahead.
  9. You're ready to bake your pie according to the instructions that will correspond to whichever filling you choose. 
 I highly recommend using a technique called "blind-baking" on your crust, so that you don't get a soggy bottom (haha).  Essentially, blind baking requires you to partially bake the crust before adding filling so you'll have a crispy bottom for fruit pies and such.  The details are laid out here.  After blind baking, you should use tin foil to cover your beautifully fluted crust, so that it won't burn to a crisp. 


After work today, I will be running a few errands before returning to the kitchen to roll out the dough, and finish the pies, as well as make some home-made vanilla bean gelato.  For pies, I'm making Pecan, and Pumpkin with traditional crust, and Blueberry with the Cinnamon-Spice crust variation (I even make little fall foliage cut-outs like in the picture above... awwwww, how cute, right?)  Hopefully there will be no tears tonight and certainly no carbon monoxide detector...

I hope that everyone has a wonderful and safe holiday!! 

Oh, and wish me luck -- I will need it!

Wednesday, October 28, 2009

Spaghetti Squash Virgins.

For someone who grew up eating rather gourmet food (i.e. oysters on the half shell, lobster fra diavolo, steak au poivre), there are many foods, especially vegetables, that I have not tried.  My family always stuck to the staple vegetables and never really strayed very far away.  I made it a point to try some different veggies this year, including artichokes and roasted beets.  I've always been meaning to try spaghetti squash, and I finally caved last night and tried this recipe for Spaghetti Squash with Jalapeño Cream, which I saw on stephmodo.


image from here.


We switched it up a bit, omitting the steeped jalapeños step (I can't do really spicy foods), and adding frozen corn to the mixture for some extra flavor since we skipped a step.  We topped the casserole with a mix of shredded Monterey and Pepper Jack cheeses, and it was delicious.  Ours was a bit on the runny side, so next time I will make sure that the sauce thickens a bit.  It made a really great main course (very filling), or side dish.  James liked it so much that he bought a bunch of spaghetti squash to run as a side special in the restaurant (and this is coming from a guy who swears that he does not like cooked vegetables that aren't potatoes). 

Tonight, I'm making my new favorite soup, and watching some of my favorite Halloween movies (more details on that later), with a hot cup of tea or cocoa.

Don't forget that Charlie Brown is on ABC tonight at 8!!

Monday, October 19, 2009

Schwarzwälder Kirschtorte


This past weekend, I went to an Oktoberfest party at my friends Jen & Jason's house.  While I don't particularly enjoy beer, I do love anything involving Germany or German culture (as I've said in the past), so I was excited to attend.  The party did not disappoint, with authentic Oktoberfest fare of homemade pretzels, Würstl, roast pork, and sauerkraut, of course.  We were all asked to bring either beer or dessert, so the obvious choice for me was dessert.  Figuring that there would be a bounty of apple desserts, I decided to go with Scwarzwälder Kirschtorte, or Black Forest Cake, which isn't really associated with Oktoberfest at all, but is traditionally German.  I'm absolutely horrific at making cakes.  Plus, I don't have a cake carrier, so it would have been a great to-do to transport the cake.  I decided to make Black Forest Cupcakes, which I will admit was a creation I thought up all on my own, without consulting any internet recipes, as per my usual course of action.

The traditional Scwarzwälder Kirschtorte is a chocolate layer cake with cherries and cherry liquor in between the layers and whipped cream as the frosting.  I decided to use Trappist cherry preserves as a filling and omitted the cherry liquor completely, since I didn't feel like buying a bottle of cherry brandy that I would never use again.  I used store-bought cake mix, because cake making is seriously something that I fail miserably at every time I attempt it.  I used Duncan Hines Butter Recipe Fudge cake mix, which I ended up liking a lot.  The cake was soft and dense and very moist. 


I made a divet in each cupcake with a melon-baller, then filled them with the preserves.  The preserves were a bit tart, which played in nicely with the sweetness of the cake and whipped cream. 


For the whipped cream, I added sugar, 1/4 tsp almond extract, a splash of Mexican vanilla, and a couple spoonfuls of the preserves to give it a pinkish tint and added flavor, then whipped it into a frenzy.  Whenever I make whipped cream, I always, always whip it until it's very stiff.  I find that if you whip it until it's almost butter, it holds up much better.  


I ended up using a pastry bag to pipe the whipped cream on the cupcakes, because it was easier than spreading it with a spoon.  Plus, it just looks nice.  Sometimes, I prefer the rustic look of just spreading with a spoon, but I felt that these needed a special touch.  I didn't have any bakers chocolate to shave over the top, so I used semi-sweet cocoa powder that I sifted on the cupcakes as a garnish.  I thought they turned out all right, and will probably make them again, because they were so easy.  I have to admit, I did feel a bit ashamed of myself, because this is probably something that Sandra Lee would make, and I cannot stand her.  I comforted myself with the rationalization that she would have dumped in cherry pie filling instead of delicious preserves, used about a gallon of cherry brandy, and used canned whipped cream, or Pillsbury canned frosting.  Knowing that this is one recipe that she would embrace and destroy, I looked it up and found this.  Much worse than I had originally suspected.  I now feel a lot better about my creation. :o)

Saturday, October 17, 2009

French Onion Soup with Beef & Barley. Yum.


So, as I mentioned in a previous post, the dinner I had at my parents' house last weekend was one of the best soups I've ever tasted.  The recipe is from Cooking Light Magazine, and combines two of my all time favorite soups into one easy, healthier version that's so simple even I can make it. 


I realize that this picture looks gross, but it's the best one I got before I couldn't wait to eat it any longer.

The recipe is a combination of French Onion & Beef Barley soups.  It calls for lots of mushrooms, so it automatically scores double points, because I looooove mushrooms.  I made it Wednesday night, and on Friday night, it tasted even better when I reheated it.  It's an absolute must to have a good, crusty baguette with this soup.

Ingredients:
  • 1  cup  boiling water
  • 1/2  ounce  dried shiitake mushrooms
  • 1  tablespoon  dark sesame oil, divided
  • 2  medium onions, each cut into 8 wedges (about 4 cups)
  • 1/2  cup  chopped shallots or onion
  • 2  teaspoons  chopped peeled fresh ginger
  • 4  garlic cloves, minced
  • 3  cups  sliced button mushrooms
  • 1  teaspoon  brown sugar
  • 1  (12-ounce) lean boneless sirloin steak, cut into 2-inch strips
  • 4  cups  water
  • 2/3  cup  uncooked pearl barley
  • 1/4  cup  dry sherry
  • 3  tablespoons  low-sodium soy sauce
  • 1  (10 1/2-ounce) can beef consommé
  • 12  (1/4-inch-thick) slices diagonally cut French bread baguette
  • 3/4  cup  (3 ounces) shredded Gruyère or Swiss cheese
* Note: you may omit the ginger, but I recommend against it... it really added a nice flavor profile to the soup.  I did not add ginger to my batch, and deeply regretted it with every spoonful.

Prep:

Reconstitute the dried shiitakes in boiling water for 15-20 minutes.  Reserve the cooking water.  Let the mushrooms cool, then chop up all of your "chopables."

Heat 2 teaspoons oil in a large pot over medium-high heat. Add onion, shallots, ginger, and garlic; sauté 10 min. or until lightly browned. Add the shiitakes, button mushrooms, sugar, and beef. Sauté 10 minutes, scraping pan to loosen browned bits. Add reserved mushroom liquid, 4 cups water, and the next 4 ingredients (water through consommé); bring to a boil. Cover, reduce heat, and simmer 50 minutes or until barley is tender. I needed to simmer mine longer, because the barley was a bit under-cooked, and the sirloin was at this awful "dry as s***" phase.  (James informed me that sirloin was a poor choice of meat for this soup, but it has less fat, so I used it.)  Stir in 1 teaspoon sesame oil (I forgot to do this).

Ladle the soup over large slices of the crusty bread, which you can toast in the oven to make it better.  Sprinkle cheese on top, or you can prepare it like the real recipe says, but you need oven-proof bowls, and I didn't want to deal with that.

Apparently, according to the website, this soup can be frozen for up to two months, but I highly doubt that you'll have any leftover to freeze, unless you make extra.  It's goooo-oood (said like Uncle Eddy from Nat'l Lampoon's Christmas Vacation).

When I made this, I cooked it for about an hour, and then ate it.  I was disappointed with the results, because the barley was undercooked and the meat was dry as a bone.  When James got home (the soup was still warm and had continued to cook), the meat and barley were perfect, so I suggest cooking it longer.  Definitely try the sirloin before you take it off the heat to tell whether it's finished.  According to chef James (who constantly chides me for my lack of cooking skills or knowledge), sirloin goes through various stages of cooking: perfectly done, dry as s***, and fall apart goodness.  Fall apart goodness doesn't happen until all of the proteins start to break down, so I hadn't hit that point in the cooking process when I ladled my dinner.  It was delicious on Friday night, however.   The addition of the mushrooms to the soup give it a really hearty flavor, and the massive amounts of protein from the beef and barley fill you up rather quickly.  It's pretty fool-proof, as long as you cook it for the right length of time.  I am definitely adding this to my arsenal of comfort food recipes, because it was an instant favorite.

The weather has been unseasonably cold here in New England, which I can't complain about, because I love the colder weather.  I feel like I've been fighting off a bug for weeks now, and am hoping that it won't get the best of me.  I've been loading up on chai tea (for the healthful antioxidants, as well as the deliciousness), sleep, and healthier foods lately, so hopefully I won't succumb to whatever crappy bug has been floating around work.  October is by far my favorite month, because it's the beginning of fall, there's Halloween, and it's acceptable to wear sweaters and scarves every day without jackets.  Perfection.  Hope everyone is enjoying it!! :o)

Wednesday, September 9, 2009

My Julie & Julia Moment.

The other day, on a whim, I bought globe artichokes at the grocery store. I'm the type of grocery shopper that goes to the store with one item in mind and picks up a couple other things that look interesting... I know it's not the best way to shop, but I can't help it.

Anyway, I was really nervous about these artichokes. I've never actually ever eaten a fresh artichoke; only the type in a glass jar (and I didn't really like it all too much). Regardless of that, I brought them home and made a quick phone call to James (who was working):

Me: Soooooo.... I went to the grocery store.
James: Oh yeah?
Me: Aaaaaand, I bought some artichokes.
James: The fresh kind?
Me: Yes, globe artichokes. Do you know how to cook these?
James: Yes.
Me: Good, because I want to make them with Julia's hollandaise.
James: Ok.
Me: Do you even like artichokes?
James: No. I actually hate them.
Me: Oh........... Good.


I decided to spare him and made them myself. I googled, "How to cook an artichoke," followed by, "how to eat an artichoke," and felt comfortable enough to try it on my own (to help save you the trouble, here's the very helpful How to Cook and Eat an Artichoke). I trimmed and washed them, then stuck them in a pot of salted, boiling water with some lemon juice in it. I boiled them (with the cover on, but ajar) for 30-ish minutes, until the stems were tender and could be pierced with a knife. The stems were really tender and the leaves actually fell off with no trouble.


To make the hollandaise, I cheated and used this recipe. The hollandaise thickened like it was supposed to, but I'm not really sure what it was supposed to taste like... It tasted really buttery, but didn't have a lot of flavor. I think I could have used 2T lemon juice instead of just 1... or maybe 1.5T... Anyway, I liked the artichokes enough, but they weren't my favorite. I did not enjoy the hollandaise (way too heart-attack tasting), but I couldn't eat the artichokes alone... I guess the meal was a little sketchy from the start, since I have no idea what it was supposed to taste like... It didn't taste terribly awful, though, and I finished cooking it before Friends was over. I guess I truly channeled Julia on this one:

“The only real stumbling block is fear of failure. In cooking you’ve got to have a ‘What the hell?’ attitude.”
~ Julia Child


At least it photographed nicely...

p.s. the actual "choke" on the artichoke (the fuzzy part) is totally weird and a bit off-putting.


Monday, June 8, 2009

Blueberry Coconut "Scuffins"

I've been somewhat restless lately. I have felt the need to take on a lot of projects around the apartment, which is a good thing, because it's much needed. After reading this post the other day, I had my mind made up that I would make these. I thought that I would change the recipe a little to fit my tastes, which include a hint of citrus.

*note: I am famous (and famously teased) for always complaining that the petite vanilla scones at Starbucks need "a hint of lemon." I don't know why this is funny, but apparently it makes me the center of merciless teasing and jokes... *

My go-to scone recipe is one from Williams-Sonoma. I use it as a base, then add in my own flavors. For Christmas, I made some lemon-cranberry scones, and they were seriously good. I decided to combine the two recipes a bit to see how it would turn out. I made three batches...

In the first one, I used dried blueberries and light coconut milk. Those are the lighter, non-purple ones. They were ok, but I felt that they were lacking in coconut flavor, and I wasn't crazy about the dried blueberries. This batch is definitely more scone-like, because I omitted the egg (because I didn't have any in the house).

The second time around, Chef James told me that I should have used cream of coconut instead of coconut milk. So, I stuck to my W-S recipe to the T, substituting cream of coconut for heavy cream, and adding an extra 1/4 c of coconut milk for liquid. The flavor is much better in the purple batch, but they tend to fall apart. Neither flavors were what I thought they would be. I don't think I used enough lemon zest in either recipe. The W-S recipe calls for the addition of one egg. I think that this plus the extra coconut milk makes these much more muffin-like. The consistency is very moist, and more airy, much like a muffin or coffee cake, but they don't have enough lemon! They've been a hit at work today, though, so I guess they're not too bad.


W-S Recipe (purple-y muffin-scones):

2 c flour
4 tbsp sugar
3 tsp baking soda
1 stick butter
1/2 c cream of coconut
1 egg
1/4 c light coconut milk
3/4c blueberries (Wyman's frozen)
1/4c shredded coconut
1 1/2 tsp lemon zest


Recipe from 17 and Baking:

2c flour
1/4c sugar
3 tbsp baking soda
1 stick butter
1 c light coconut milk
1/2 c dried blueberries
1/3 c shredded coconut
1 tsp lemon zest

I sprinkled sugar in the raw on the tops before baking both batches -- a necessary last minute touch, in my opinion!


My mini scone pan from Williams-Sonoma is so convenient! The scones come out perfectly shaped and sized every time. I highly recommend it!

* all photos by me.

Wednesday, June 3, 2009

Erin Cooks.

I don't remember how I came upon this blog, but I love it. Erin Cooks is a food blog with the most unbelievably delicious pictures I've ever seen, plus she's from the Boston area, which automatically makes me like her! I'm not much of a baker or cook, but reading her blog really makes me want to get busy in the kitchen! I have yet to try out any of her recipes, but judging from the pictures, I'm sure they taste fabuloso!

I'm definitely going to try these raised doughnuts, once I get a bread maker (or borrow my mother in-law's)! These are making my mouth water right now... and if you're slightly hungry right now while reading this, I wouldn't recommend reading this post on her blog, because it will make you want to eat your own arm off. Seriously.


These toaster tarts look really simple, and I'm pretty sure that almost anyone could make them. Plus, they're easy to freeze, then heat up in the toaster on the go. And, they're really cute!


I literally had to wipe the drool off the corner of my mouth while reading up on these:


For those who don't know, I'm a carb queen. I cannot resist rolls, bagels, or bread of any sort, which is why James and I got into our biggest fight ever (and we hardly fight -- for real) when I was on Phase 1 of the South Beach Diet (no carbs at all!). He ordered pasta for dinner... I think I could probably have likened myself to an erupting Mount Vesuvius. It was scary...

This coconut cake (Sublime Coconut Cake, I should say) is her most recent endeavor, and it's a recipe from the book Too Many Cooks. The cake sounds delisioso (if you enjoy coconut), and I'm going to have to give it a go this summer... My last foray with baking cakes from scratch ended with sadly sunken cupcakes. :o( We'll see how this goes.

As a promotion, she's giving away a copy of Too Many Cooks to one lucky reader who comments on the post, so head on over and leave some comments!!


* All photos courtesy of Erin Cooks. Go check it out. seriously.

Thursday, April 16, 2009

Wild Mushroom & Pea Risotto, from scratch

Risotto is one of my favorite things to cook. It is definitely a labor of love, but the finished product is worth it. A friend of mine recently expressed her distaste with a risotto she made from a mix, and I promised to post a how-to for diy risotto (I'm finally getting around to it).

My favorite risotto recipe is from Giada de Laurentiis' cookbook, Everyday Italian. I am a huge fan of Giada, because she makes Italian cooking more accessible to normal people, like me. I used to watch her show religiously, but have since gotten away from it now that I'm not in college anymore. I still covet her cookbooks and pore through her recipes whenever I'm looking for something to try out. Some of my most successful attempts at cooking have been from her recipes, whether copied exactly, or adding my own twist. In a nutshell, I love her. I think she's a
kitchen goddess.

Before I delve into my world of cooking madness, I must give this disclaimer:


this is my small, ugly, 1950's style apartment kitchen. this is why i don't do a lot of cooking (although, i do love my dish towels).


Risotto takes some time and patience in order for it to turn out alright. You should expect to spend at least an hour making it, and this is time standing over a stove, not leaving it and watching American Idol while it cooks.


I am not a professional chef. My husband is, but he in no way condones my presence in the kitchen. In fact, he often laughs at my techniques and lack of knowledge. Whatevs.


I am not a picky eater. I will eat almost anything as long as it's not too spicy, and I am slightly lactose intolerant, so I try to limit my dairy intake (even though I don't really succeed). I don't have a problem with the textures of food, as in, I love mushrooms, both cooked and raw, even though they're mushy and are technically a fungus. I have a strange palette, and enjoyed eating raw oysters on the half shell as early as age 12. That being said, what I claim in this post to be delicious might not be your proverbial cup of tea.

The easiest way to explain the techniques necessary for making risotto, is to show it through pictures… So, here they are:

Step 1:


A glass of wine is a necessary starting point for almost every good italian dish. Especially risotto.


Ingredients:


- 3/4 c Arborio Rice (I recommend Pastene brand, because it's usually available... check the specialty Italian section of your grocery store)

- Chicken Broth (I used fat free and couldn't taste any difference)

- 3/4 c chopped onion

- 2 cloves garlic

- 1 pkg dried exotic mushrooms (I used oyster because they were available, Giada used porcini)

- 1 carton white mushrooms

- 1/3 c white wine (use any white wine that you would enjoy drinking -- see step 1)

- olive oil (or butter)

- frozen peas (I didn't measure them -- add to taste)

- water (only if you run out of chicken broth)

- Parmesan cheese


The first step is reconstituting the dried mushrooms. Simmer your mushrooms in the chicken broth according to the package instructions (mine said 20 minutes). Using a slotted spoon, remove the mushrooms and save the chicken broth. Your chicken broth will have reduced, so add some water to bring it up to the original level, and keep it over a low heat setting.


Chop 3/4c onion. I always use sweet onions, because that's my personal preference, but you could use any other type.


In a sauce pan, heat up a dollop of olive oil. I don't usually measure it, but I assume that it's approximately 2 tbsp.


Cook the onions in the olive oil on a medium heat setting until translucent, but not browned (this will take approx. 8 minutes).


this is what they will look like.


While your onions are cooking, chop up your mushrooms and garlic. I typically use a lot of garlic and mushrooms, because I love both, and mushrooms reduce significantly when cooked.


Tip: smash the garlic with the flat part of your knife to release the flavors and help peel the skin.


Add your garlic and mushrooms together and saute for approx. 10 minutes, until mushrooms reduce in size.


When the mushrooms are cooked, make a well and add a little more olive oil. Add the Arborio rice to this well, and mix thoroughly, making sure to coat the rice with olive oil.


If this is your first time making risotto, be sure to look closely at the rice. You will see that the center of the rice is bright white and opaque. This will change when it's fully cooked, and it will be important to monitor the color and texture of the rice throughout the cooking process.


Add 1/2 c wine, and stir until the wine has been absorbed into the rice. This is the key point to making risotto: you add liquid in small amounts and slowly let it cook down before you add more liquid. The slower you cook your rice, the better it will be.


When your wine has been absorbed, use a ladle to add your broth. You should add enough liquid so that you can easily stir the rice mixture, but not so much that the level of liquid is over the top of the rice. Your liquid level should be about 1/2 that of your rice. Let the liquid slowly absorb into the rice, and stir frequently (that's important, too) before adding more liquid.


The whole point of tediously adding liquid, letting absorb into your rice, and stirring frequently is to allow the starch in the rice to release slowly, which creates the creamy texture that risotto is known for. There isn't actually any dairy in it to make it creamy (except the cheese, of course) -- it's all the magic of the rice.

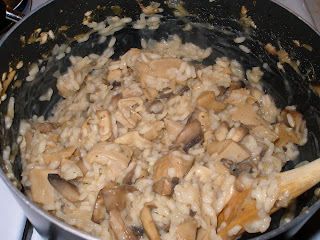
You risotto will become increasingly difficult to stir, but it's important to continue stirring to be sure that all of the rice is making contact with the liquid (and that it's not sticking to the bottom of the pan, or else you'd have pseudo-paella). This is what your risotto will look like when it's almost finished (you can see that the edges of the rice aren't transparent anymore):


And this is what it will look like when it's completely finished (see the difference in the texture?):


Turn off the heat and add your peas and cheese and stir. The heat from the pan and rice will melt the peas, so you don't have to precook them.


And this is what it looks like when it's all finished and plated. My goal for the end product is to have a consistency of glue, so the rice is rather sticky and a little "mushy." I think that more traditional risottos have a bit more liquid, but it's just the difference of cooking off liquid in the end or not. It's all personal preference.

This recipe makes a lot of risotto (I cut Giada's recipe in half), and with the amounts I used, you could easily serve three or four people (as a side dish).


And that's it!


Between reconstituting the mushrooms and chopping all the veggies, it took me approx. 2 hours from start to finish. I used a really low heat setting, so it took me a lot longer than it probably should have.


You can substitute any ingredients you want, but if you use a greasy meat, you should precook it and drain off any grease that it produces. Prosciutto would be a delicious addition to the mushrooms and peas (too bad I didn't think of that at the grocery store).


It's not so bad once you get the hang of it, and it's easier with practice. It may seem intimidating at first, but just try it, and don't try to adhere to measuring ingredients or cook times exactly. I always feel that with cooking, it's much better to add your own flair (not like baking).


* Note: Please excuse the typographical errors in the early release of this post (I think I fixed them all). I was on my second glass of wine when I wrote this at 11pm last night, and to be quite frank, I'm a cheap date when it comes to wine. I have finally come to know the importence of proof-reading.

Followers